Showing posts with label Windows XP. Show all posts

What is Microsoft .NET Framework? Download Links for All Versions Inside

Many times you download a software and find that its not working in your system. You get an error message that Microsoft .NET Framework needs to be installed.

It means that it is required that .NET Framework is installed in your system to be able to use the software.


So what is .NET Framework and why do some software need it?

We have received such kind of questions many times and people find it difficult to install .NET Framework as most of the times software developer don't provide links to download it.

So today, in this topic we'll tell you what is .NET Framework and will also provide official Microsoft download links to download each version of .NET Framework.
What is Microsoft .NET Framework?
Microsoft .NET Framework is a software framework which is installed in Microsoft Windows. Software which are developed using .NET require .NET Framework to be installed in your system to be able to run.
Once you install .NET Framework, it creates the required software environment so that it can provide the appropriate runtime requirements to the software.
.NET Framework can be installed in Windows NT, 98, Me, 2000, XP, Server 2003, Vista, Server 2008 and 7.
List of All Microsoft .NET Framework Versions
There are several .NET Framework versions available. Some are included in some Windows OS by default and all are available to download at Microsoft website as well.
Following is a list of all released versions of .NET Framework:
  • .NET Framework 1.0
  • .NET Framework 1.1 (comes installed in Windows Server 2003)
  • .NET Framework 2.0
  • .NET Framework 3.0 (comes installed in Windows Vista and Server 2008)
  • .NET Framework 3.5 (comes installed in Windows 7 and Server 2008 R2)
  • .NET Framework 4.0
Following are download links for all Microsoft .NET Framework versions available:
Download Link for Microsoft .NET Framework 1.0

Download Link

SP3

Download Link for Microsoft .NET Framework 1.1

Download Link

SP1

Download Link for Microsoft .NET Framework 2.0

Download Link (x86)

Download Link (x64)

Download Link (ia64)

SP1 (x86)

SP1 (x64)

SP1 (ia64)

SP2

Download Link for Microsoft .NET Framework 3.0

Download Link (Web Installer) (requires Internet connection at installation time)

Full Standalone Installer (x86)

Full Standalone Installer (x64)

Download Link for Microsoft .NET Framework 3.5

Download Link (Web Installer) (requires Internet connection at installation time)

Full Standalone Installer


SP1 (Web Installer) (requires Internet connection at installation time)

SP1 (Full Standalone Installer)
Download Link for Microsoft .NET Framework 4.0
Download Link (Web Installer) (requires Internet connection at installation time)

Full Standalone Installer


Above standalone installer supports x86, x64 and ia64 architectures but some features are not supported on ia64 for example, WPF.

If you need to install it in x86 system only, then use following direct download link:

Full Standalone Installer (x86)


And if you need to install it in ia64 system only, then use following direct download link:

Full Standalone Installer (ia64)


Phew... It took a lot of time to compile this topic and find out download links for each version.

Quick Tips to speed Mozilla Firefox

Improve Firefox Performance by Clearing the Downloads List

Recently I noticed that whenever I downloaded a file in Firefox, the program turned into molasses--especially just after the download finished. The browser would literally freeze up for seconds at a time for about a minute after.


On a whim, I opened up the Downloads list (accessible by pressing Ctrl-J). It was pretty lengthy; I hadn't cleared it in as long as I could remember. Admittedly, I just never bothered, as I didn't think it necessary. Also on a whim, I clicked Clear List, which wiped the slate clean, so to speak. (This doesn't delete your downloads, but merely Firefox's record of them.)

You know what? The next time I downloaded a file, Firefox hummed along like its regular speedy self. No hangs, no delays. I'm not sure why this made the difference, but it definitely did. If you're encountering a similar issue, I recommend trying the same procedure.


Remove Old Versions of the Java Console From Firefox

Java, of course, is the programming language/platform that's used by various Web sites and apps--you know, the thing that's constantly nagging you to install updates.

Every time you do so, Firefox inherits a new version of the Java Console (a debugging tool that's useless to the vast majority of users). Unfortunately, the old ones don't get deleted. Does that impact Firefox performance? I don't know for sure, but it can't help--and I do know I don't want half a dozen Java Consoles cluttering things up!


If you look at your Firefox Add-ons list (by selecting Tools, Add-ons), you may indeed see several instances of Java Console. However, you'll also notice that the uninstall button for each one is greyed out. How can you remove the old Consoles?


Simple: Exit Firefox, then run it as an administrator. To do so, right-click your Firefox desktop icon, then choose Run as administrator. Now, when you go back to the Add-ons list, you'll have the option of uninstalling Java Consoles.

You can probably get rid of them all, though I recommend keeping the one with the highest version number, just in case the Java Runtime Environment needs it for some reason.

Make Firefox Immediately Switch to a Newly Opened Tab

Normally, when you click a link that opens a new tab (or hold down the Ctrl key while clicking a link, which forces a new tab to open), Firefox doesn't actually switch to that tab. It keeps you where you were. That doesn't make a ton of sense. After all, why would you open a new tab if you didn't want to view it right away?


Fortunately, there's an easy way to change Firefox's behavior when it comes to new tabs: Click the Tools menu, then Options, and then click Tabs. Enable the last option in the list: When I open a link in a new tab, switch to it immediately. (Pretty straightforward, huh?) Click OK and you're done.

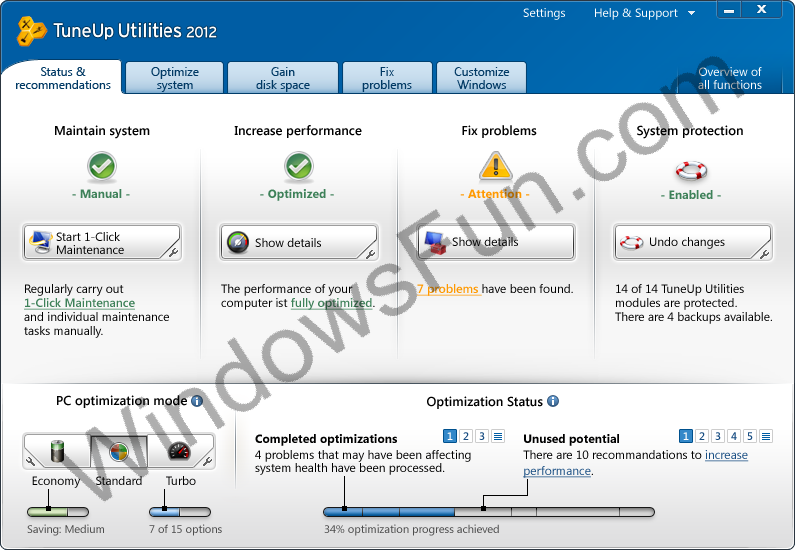
Download TuneUp Utilities 2012 full version for free

TuneUp Utilities 2012 can quickly make your Windows operating system faster, easier to use, and more secure. And all operations performed on the operating system are completely safe, because all changes are monitored by TuneUp Rescue Center and can be undone at any time. All TuneUp Utilities modules can be accessed through a common interface that is divided into six categories. In addition, the main window also has three general buttons in a dark gray bar to the right at the top of the window. Pressing the first button starts the TuneUp Rescue Center module. The second button starts the TuneUp Update Wizard, which can be used to update TuneUp Utilities 2009 to the latest version over the Internet. The last button provides help and settings that you can use to customize the software package to meet your needs.


The new Start page:

TuneUp Utilities 2011 welcomes you with a completely redesigned Start page, which tells you about the status of your computer. If problems or nonoptimal settings are found, you are only a mouse-click away from resolving them. The Start page also tells you when new tips for increasing computer performance are available and warns you if maintenance tasks are not being taken care of automatically. The Start page also shows you whether new automatic startup programs have been added to Windows since the last time you ran TuneUp Utilities. You can decide whether these programs that start up automatically are really necessary.


TuneUp Speed Optimizer:

Which settings slow your computer down? Which unnecessary services or programs are running in the background? Is your Internet connection optimally configured? TuneUp Speed Optimizer knows the answers to all these questions. It examines your entire system for bottlenecks, superfluous background programs, and incorrect settings. Great: with just one click you can carry out most optimizations very quickly. In addition, TuneUp Speed Optimizer provides suggestions for speeding up your system.
TuneUp Shortcut Cleaner:

Cleaning up your working environment is tedious: removing invalid shortcuts from the Start menu, the Desktop, and the Quick Launch bar is very time-consuming. TuneUp ShortCut Cleaner now does the work for you. It checks whether all shortcuts are valid and removes the orphaned ones with just a click of a button. At the same time, empty folders are removed from the Start menu. TuneUp ShortCut Cleaner also checks frequently used programs and cleans up the list of recently opened files.


Support for the Opera browser:

After hard disk defragmentation, which we introduced in TuneUp Utilities 2009, the feature most requested by customers was support for the Opera browser. TuneUp Utilities 2010 now also includes full support for Opera. Via several special Opera settings, TuneUp System Control now allows you to change the number of Speed Dial entries, conveniently choose your default search engine, and reenable fast backward and forward navigation. Internet optimization lets you optimize Opera's performance for your Internet connection. Free up disk space lets you delete the Opera cache.


TuneUp Styler:

Now you can also change the Vista logo animation which appears just before logon. You can download a whole series of great animations from the TuneUp website. Or, if you prefer, you can choose your own personal image to display while Vista starts up. With Vista, you can also add your own images to Vista's logon screen: With just a few mouse clicks you can create a truly personal logon experience.


TuneUp Uninstall Manager:

Redesigned from the ground up, TuneUp Install Manager now runs much faster and has a new, even more intuitive interface so that it is even easier to uninstall unnecessary programs. Unnecessary programs often are forgotten because they were installed a long time ago and then not used. TuneUp Utilities 2009 shows you a list of programs not used for a long time so that you can target for uninstallation those applications that use valuable disk space and in certain circumstances even slow your system down.


TuneUp StartUp Manager:

A smooth-running system results when there are no unnecessary autostart applications. The improved TuneUp Startup Manager organizes your programs into groups and provides clear explanations to make it easier for you to identify those programs that are not needed.New automatic startup programs are now highlighted so that you can disable unwanted entries more easily. System start tasks are now also listed in TuneUp StartUp Manager In Vista, in particular, scheduled tasks are used in place of autostart entries.


Free up disk space:

The already rapid display of disk space to be freed up is now even faster on NTFS drives. And now it is so easy to delete even more unnecessary files, like the backup files for the first Windows Vista service pack and the Opera and Safari caches. The second "Free up disk space" module that helps you turn off Windows functions that use excessive disk space has also been enhanced. The Windows Search index can now be disabled and deleted with a single click. This makes particular sense if you are already using a different search engine. In addition, TuneUp Disk Space Explorer now runs faster and no longer requires that an entire drive be analyzed. You can now specify that only those folders be analyzed that you are really interested in.


Lots more improvements:

Along with the totally new features, there are a series of improvements that are not immediately visible. There are small improvements like Tooltips in the main window, a substantial increase in the number of problems that can be found byTuneUp Registry Cleaner, and better progress feedback from TuneUp Drive Defrag. But there are also big improvements "under the hood". Two good examples are a completely reworked installation program and significant improvements in our update technology.
So we can conclude that TuneUp utilities is indeed a great program to keep your PC tuned  up. Click the download link below to download TuneUp Utilities 2012 full version.

How to get old Facebook chat back

Sometimes changes in the layout of Facebook often gets a thumbs down by the users. Just like how much people hated the new Facebook layout with photo streams above, similarly do people found the new social chat window appearing on the right sidebar as equal irritation. In order to disable this chat sidebar that shows photo thumbnails of friends available for chat and recover the older chat view then lets play with some workarounds.

Disable New and Recover Old Facebook Chat

There are two apps for Mozilla, Opera and for Chrome that does the magic. I will recommend that you try both of them and see which one you like the most. 

Recover Old FaceBook Chat:

This add-on will replace the new social chat window with the older one. You can download the Chrome extension by clicking here 
new facebook chat sidebar

Facebook Chat Sidebar Disabler:

This add-on performs the exact same operation but with a different style. This one works for smart phones like IPhone or android because it has an Opera version. After installing the add-on in order to toggle between old-style chat and new-style chat, use the Options menu in the buddy list.
Hope it helps you....

Rebuild your Corrupt Icon Cache with IconCache Rebuilder

Sometimes you may find an icon that just won’t display correctly no matter what you do. These problems arise due to the fact that due to some recent software installation or Windows update, your IconCache.db has been corrupted.

TWC in conjunction with Lee Whittington have released IconCache Rebuilder for those of you experiencing weird problems with your icons in Windows 7.


For example, you see here, my Normal Select.cur is completely wrong.


After running IconCache Rebuilder, the icon now displays correctly.

All you have to do is download IconCache Rebuilder from the link given below, extract and run it.  Make sure that Icon cache located is reported and click Rebuild.


Windows Explorer will be restarted so make sure no copying/moving is occurring and any open programs are saved just in case.

When IconCache Rebuilder has done its job, you’ll be notified Windows needs to be restarted to apply the changes.  Click OK.


If you don’t want to restart your PC immediately, just right-click the icon on the taskbar and click Close window.


Otherwise Click Restart PC

 
So in this way you can easily restore your IconCache.db and hence get back your old, sweet Windows Icons.

Below is the link to download IconCache Rebuilder

Download 

BOOTICE – Modify, Backup, And Restore Master Boot Record & Partition Boot Record


BOOTICE is a portable utility developed for power users who need to either modify or backup and restore MBR (Master Boot Record) and PBR (Partition Boot Record) of  local drives or removable media including external hard drives, USB drives, etc. For those who don’t have clue of these boot records, MBR is generally referred to as first sector (size : 512 bytes) of any partitioned drive whereas volume or partition boot record holds code to initiate booting and is invoked by MBR.

Warning for beginners: It is not advisable to fiddle around with master boot record or with volume boot record, as it can change system booting process and can leave your PC unbootable. We will recommend that you use BOOTICE with removable media and not with auxiliary storage disks.

Coming back to features, it lets you backup MBR of selected drives (primary or external) and enables you to create disk images (IMG & IMA format), fill up disk space with random data, manage partitions while allowing you to edit Boot Configuration Data (BCD file) to tweak with system booting process.
It supports multiple boot record types ranging from Windows NT 5/6, Plop Boot Manager, SYS Linux, to Grub4Dos. On the main interface, it displays all attached external storages along with primary disk. Underneath it, you have options to process MBR & PBR, to bring up partition manager and check out disk data sector-wise. Process MBR and Process PBR buttons let users backup and restore the boot record. Before starting out, you need to choose the boot record type to begin the process. The backup is created in BIN format. It’s must be noted here that before restoring boot record, you will need to specify the correct boot type with which boot record backup was created.


Partition Manager allows user to backup and restore partition table, change and remove drive ID, format/re-format disk with a facility to format only selected part of disk.


As mentioned beforehand, it is capable of processing disk images in IMG or IMA format, you can select the disk image file to backup its master boot record & volume boot record and view the data distribution in sectors. Depending on the OS type, it can bring up BCD file editor with relative options to change booting process. Under BCD Edit tab, BCD file can be specified manually or you can let it find out the location of currently active OS BCD file.


Random data filling makes data on selected disk unrecoverable. With its Disk filling feature you can fill selected disk with 0×00, 0xFF or with custom data in snap to ensure data safety.


We found BOOTICE to be very useful. Since it is a portable application, you can carry it anywhere to modify and backup MBR and PBR of almost all types of disks. With other complementary options like BCD editing and data filling, booting behavior can be altered on the fly without having to search for BCD file while you can destroy disc data by filling random junk to prevent recovery operations. It supports Windows 2000, Windows XP, Windows Vista, and Windows 7.

Download

How To Uninstall Windows 8


The recently released Developer Build of Windows 8 comes with far less number of features and UI enhancements that will be included in final release of Windows 8, therefore many users have decided to remove Windows 8 from their system after testing it out. The Developer Build has been specifically released for Windows application developers to build new applications for Windows 8 and test and fix compatibility issues. If you’re about to uninstall or remove Windows 8 from your system, there are few things which must be considered before you start off with the process. First, it’s advised to remove or disconnect Windows Live account and create backup of important files and folders to external storage device. Windows 8 dual booted with Windows 7 can be easily removed from the system by formatting the Windows 8 drive, but dual boot option (which asks you to choose the OS to boot) in Advance Boot Options menu has to be manually removed. In this post, we will let you know how to completely and safely remove Windows 8 dual booted with any other OS.

To begin, login to Windows 8 and move all important files and folders to external storage device, remote network location, or to local drives except one on which Windows 8 is currently running. Once data backup is complete, reboot your system, choose Windows 7 from boot options.

After logging into Windows 7, open My Computer, right-click Windows 8 drive, and select Format. Select File system followed by default Allocation unit size, enable Quick Format and click Start to begin the disk formatting process.


After formatting the drive, you need to remove the Windows 8 Developer Preview boot option from Advanced Boot Options menu. This requires using BCDEdit command to modify or remove the Windows 8 Developer Preview boot entry. However, if you want a GUI alternative for BCDEdit command, download BOOTICE.

BOOTICE is a portable, Windows utility which allows you to edit Boot Configuration Data file from a simplified interface. Launch BOOTICE.EXE and head over to BCD Edit tab. Make sure that The System BCD option is enabled. Click View / Edit button.


It will open BCD editor. Select Windows Developer Preview from left sidebar and hit Del to delete the Windows 8 Developer Preview entry from Advance Boot Options menu.


You can follow same steps for removing Windows 8 Server Developer Preview from the system. After you’ve formatted the Windows 8 Server drive, launch BOOTICE, open BCD editor and delete the Windows Server Developer Preview entry in system BCD file.


Users who did a clean install of Windows 8 Developer Build after removing Windows 7 need to use Windows 7 installation disc to remove Windows 8 Developer Build and then install Windows 7 on their PCs. As of now, Windows 8 doesn’t allow upgrading your PC from Window 7 to Windows 8. We will keep this post updated with Windows uninstallation methods for each iteration of Windows 8 version.

Facebook Messenger for Windows Released, Direct Download Link Inside

If you are a Facebook user, here is an exciting news for you. Facebook team has released the official Facebook Messenger for Windows users.

Facebook Messenger is basically a chat client for Windows which allows you to chat with your Facebook friends without going to Facebook website using a web browser. So you can consider it similar to Windows Live Messenger or Yahoo! Messenger.
Using Facebook Messenger, you can:
  • Chat and message with your friends on Facebook
  • See the latest updates from your friends in ticker
  • Get quick notifications about what’s going on
 Facebook Messenger can only be installed in Windows 7 at the moment. When you install it, it asks you to login using web browser. As soon as you log into your Facebook account in web browser, the messenger application automatically logs you in.
The interface looks as shown in following screenshot:


As you can see the UI is very simple and similar to Facebook website UI which helps you in getting the same feeling which you get while browsing Facebook website.

The messenger window also allows you to dock it to the right-side of your computer screen which makes it look-like a Desktop sidebar. To dock it, you just need to click on the small icon given at the extreme bottom-right corner of messenger window. Or you can right-click on messenger window in system tray and select "Dock Window to Right" option. To put it back, you can either deselect the option or click on the same icon present in bottom-right corner of messenger window.

You can log out anytime by right-click on its system tray icon and select "Log out" option. Keep in mind, it'll also log you out from main Facebook website in your browser.
You can download it using following direct link:

Download Facebook Messenger


You can join us on Facebook using our official Facebook page:

Join us on Facebook

[Virus Removal] Is Your Computer Infected with Virus, Spyware, Adware or Trojan?

If your computer system is running slow and giving you random problems, it might be infected with a virus. You can find and remove the virus from your PC using following simple steps:
STEP 1 : Post Your HijackThis Log File Content
Download HijackThis from the link given below and scan your system with it. It'll generate a log file, copy the content of the log file and post here.

Download Link
STEP 2 : Fix Suggested Entries in Safe Mode
Note down the suggested entries and boot your Windows in Safe Mode by pressing "F8" key at system startup and select "Safe Mode" option. Run HijackThis again, select all suggested entries and click on "Fix checked" button.


It'll remove the suspicious items from your computer system.

Also don't forget to install and scan your computer system with a good anti-virus and anti-spyware for better protection.

EaseUS Todo Backup Free 4.0 Released, Download Now

EaseUS Todo Backup, the best free backup solution out there for Windows, has been updated to version 4.0 and is now available for download from the official page. The newest version of Todo Backup features a brand new user interface and includes two major features over previous versions.


Support for GPT (GUID Partition Table) Disk, and support for Exchange Server 2010 are the two major new features in this version. Other than these new features, this version also includes a number of fixes and improvements.

While users who have used or have been using previous versions of Todo Backup will not notice major changes in this version (except the above mentioned features), new users who are switching from other free backup solutions will certainly find it as the best free backup solution.


Just like previous versions, version 4.0 also sports a clean tabbed user interface. The UI displays four tabs: Home, Management, Logs, and Upgrade. The Home tab contains common backup and recovery options such as data backup, system backup, disk clone, partition clone, file recovery, system recovery, wipe data, check image, convert image, and mount/unmount.


 The management tab provides details on backups and also allows you manage previously created backups. Backup name, created time and date, status details can be found here.  Options are also available to edit backup contents and location. You can also initiate new backups from here by clicking New Backup button.


One-click system backup and recovery, backup network data, file and folder backup, scheduled backup, disk clone tool, disk and partition backup, email notifications of backup results are some of the core features of EaseUS Todo Backup.

Unlike other free backup software, it can backup entire disk(s), GPT disk(s), partition(s), or dynamic volume(s) in a few mouse clicks. The inbuilt compression tool lets you select a compression level to save the disk space. Besides, you can also password protect your backup image file with 256 bit AEC encryption.


Users who have used Todo Backup to create an image of a partition or GPT disk can use the mount feature to explorer the contents of the image file.


One can also run Todo Backup without booting into Windows. Todo Backup lets you create a bootable media (USB, CD or DVD) so that the user can easily perform recovery in case of system crash. The Wipe Data option is another nice feature, which lets you completely erase sensitive data on a disk to protect privacy.


The software packs-in all the important features that you would expect in a free backup solution. Todo Backup version 4.0 is compatible with Windows 2000, XP, Vista, Windows 7 operating systems.

Smart Folders: Freeware to Get iOS and Android Style Folder Creation Functionality in Windows

If you have used Apple iOS or Google Android OS, you must be aware of a built-in feature which allows you to create a new folder using a simple drag-n-drop of one app over another.

On the other hand, Microsoft Windows OS doesn't come with such a useful feature. Although Windows provides keyboard shortcut "Ctrl+Shift+N" to create a new folder or you can click on "New Folder" button present in Explorer toolbar or you can right-click and select "New -> Folder" option.
Today we are going to share a free and portable tool which brings this useful drag-n-drop functionality to create new folder in Windows.

"Smart Folders" is a free utility for Windows released by our friend site addictivetips which allows you to create a new folder by simply dragging-n-dropping one or more selected files over another file. For example, you have 4 text files on Desktop and you want to move them in a new folder. You just need to select 3 text files and drag-n-drop them over the 4th one and this free software will automatically create a new folder on Desktop and will ask you to provide a name for it.


When you run this app first time, it asks you to register the file types. You just need to click on "Install" button and you have done. By default, this utility registers all known and built-in file extension but some 3rd party software use their own file extensions like .psd of Adobe Photoshop. If you like this freeware to work for these 3rd party extensions as well, you can manually register these file extensions by typing the file extension in given text box and click on "Register" button. You can unregister any particular file extension later if you want.
This free utility can be used in Windows XP, Vista and Windows 7. Both 32-bit and 64-bit editions are supported.

You can download it using following link:

Download Smart Folders

List of Easter Eggs by Google

Today we are going to share 4 new easter eggs found in Google Search.


  • Do a Barrel Roll
  • Tilt
  • Let it Snow
  • Hanukkah


"Do a Barrel Roll" or "Z or R Twice" easter egg is inspired from a video game "Star Fox" developed by Nintendo in which a rabbit asks to do a barrel roll.

To enjoy this easter egg, simply type "Do a Barrel Roll" or type "Z or R Twice" in Google search box and the search results page will do a barrel roll before showing the results.


"Askew" or "Tilt" is another cool easter egg in which the search results page looks a bit weird and out of place. To enjoy this easter egg, simply search for either "askew" or "tilt" in Google.


"Let it Snow" is a new easter egg found by AskVG readers "kennethesp" and "SaidSikiraX" in Google search results page. A Christmas gift from Google team:


"Hanukkah" is also known as Festival of Lights. This easter egg shows a nice row of stars below the Google search box:


These easter eggs work in almost all modern web browsers. If you know about any other easter egg, feel free to share it in your comment...

[Fix] Chrome downloads index file instead of opening websites

As the popularity of Google chrome browser increases day by day, many internet users now migrating to chrome browser because it is simple, fast and safe. The problem I'm going to share you is a strange one. When you opens up some websites like Yahoo Answers, or eBay, no page is displayed but a file named "index" or "download" with no extension sizes a few kilobytes will be downloaded. When you opens some certain other websites, it'll show only gibberish text. If this is your problem, then I have a solution.


This problem is actually not caused by Google chrome but Internet Download Manager(IDM) plays here. When you should have IDM installed in your system with advanced browser integration turned on for chrome, IDM caches the request to download the web page as a file download.

Anyway, to get rid of this annoying issue, open IDM goto downloads > Options > General , look for google chrome in advanced browser integration section and uncheck it. Also uncheck detect new applications that try to download files from internet. Reboot if required. Done!

Ultimate list of free Data Recovery Tools

Hi, I recently  performed a PC recovery by a mistake then I lost some important files from my computer.So I searched for some data recovery software's and found these are best  for recovering lost data from hard disk. Most of them are free to download and use. (download links are also provided)
IMPORTANT: Always install and run data recovery software's from an external or separate disk drive. If you feel your data extreme important, then contact any data recovery expert.

If you need to perform data or file recovery
1. Back up all data
2. Do not defragment your storage device before file or data recovery
3. Do not copy any thing to the device that has to be perform data, file recovery
4. Do not install or uninstall any new software's before data recovery
5. Do not run any software's unnecessarily

1.Undelete Plus
This application Quickly recover all deleted data, files from your hard
drive or flash drive..etc
Size:3.66 MB

Download Undelete Plus

2.UndeleteMyFiles
UndeleteMyFiles is a FREE data recovery software that recover deleted files from  CF and SD cards and USB flash drives and other storage media.
Size:1.96 MB

Download UndeleteMyFiles


3.PC Inspector FILE RECOVERY
This is a free software that supports FAT 12/16/32 and NTFS file systems.This program can be used to recover boot sector files and is one of the best tool for hard drive data recovery.
Size:5.83 MB

Download PC Inspector file recovery

4.Recuva
Recuva is a freeware utility that restores files that have been deleted from your hard disk drive.It's small in size  and is portable.
Size:3.58 MB

Download Recuva

5.Pandora Recovery
This free utility allows us to find deleted,encrypted files,movies,documents..etc and restore them.
Size:3.11 MB

Download Pandora Recovery

6.Restoration
An easy to use tool to recover file s that are accidentally deleted from computers.
size:229 KB

Download Restoration
If you know some more, please feel free to add them in the comments below 

Double File Copying Speed Using Teracopy

If you want to copy big files usually in GB size from DVD, pendrive to hard disk, it will take plenty of time to complete the copying process. It's a big annoyance when there's lack of time. But now there's a solution to that too. There's an application software called Tera Copy, that will speed up the data transfer between computer and storage devices. This software can give better speed while copying your files from usb drive, cd or DVD. Moreover teracopy doesn not amke any problems for your operating system or data. It's run like a standalone tool. All you have to do is to just drag your source file to teracopy window, select destination and click copy or move. Here's Teracopy in action:


Download TeraCopy

SageThumbs: Free Windows Explorer Extension to Show Thumbnail Previews and Convert Image Formats

As we all know we can show thumbnail previews for image files in Windows Explorer to view or identify the image without opening it. But by default Windows can't show thumbnail previews for all image file formats. There are a few file formats like PSD, TIFF, TGA and XCF which can't be previewed by Windows Explorer.

Wouldn't it be great if we could see thumbnail previews for almost all image files in Windows Explorer? Don't worry! Today we are going to share an absolutely free and small extension for Windows Explorer which allows you to show thumbnail previews for many unsupported file formats in Windows Explorer.
"SageThumbs" is an excellent shell extension for Windows which allows you to preview almost all image file formats in Windows Explorer. It uses popular image viewer XnView's GFL library for this task.

1

Along with showing thumbnail previews, it also allows you to convert an image format to another which is an extra benefit of using this small utility. You can convert an image format into JPG, GIF, PNG and BMP file formats.

You can even see an image file thumbnail preview in its context menu, Just right-click on an image file and you'll see its thumbnail preview in context menu.

You can also set the image file as Desktop wallpaper by right-click on it and select the desired option. You can also select the wallpaper type (stretched, tiled, centered).

2

This extension adds some detailed information in image files tool-tips. Whenever you hover the mouse cursor over an image file, you can see extra info like resolution DPI, compression format, colors, etc in its tool-tip.
If you want, you can enable / disable a particular image file format to be previewed by SageThumbs using its Options window. You can also disable its context menu entry, thumbnails in Explorer or customize thumbnail size, conversion options, etc using its Settings.

3

Features List:


>> Extended thumbnail image view of Explorer folder
>> Thumbnail image in explorer context menu
>> Extended info tips
>> Support 162 image formats (224 extensions)
>> Support additional 26 image formats via XnView plugins
>> One-click conversion to popular image formats support
>> Wallpaper selection support
>> Copy to clipboard support

This extension can be installed in Windows 2000, XP, Vista, Windows 7, Windows Server 2003 and 2008. Both 32-bit and 64-bit editions are supported.

You can download it using following link:

Download SageThumbs


[Guide] Safety Precautions to Setup and Install a 3rd Party Software in Windows

We all know that installing a software in Windows is not a very hard task, its quite easy. You just need to follow a few simple steps given in the setup wizard to complete the software installation. Most of the times you just have to click on the "Next" button 2-3 times to finish the setup process.

I have seen many people saying, "Just click on Next, Next, Next and done." while teaching someone how to install a software. And guess what? If you are going to follow such kind of advices, get ready to install some adware, spyware or unnecessary and undesired software as extra bonus. Actually many times when we get a 3rd party software from Internet, CD or from a friend's PC, chances are the software is bundled with unwanted toolbars or adware. Software developers get paid from the companies to include their toolbars or other undesired stuffs in setups.

There are many other drawbacks of not taking precautions while installing software. Today in this article, we are going to share a few very important points which you should always keep in your mind while installing a software.

The important points are:

>> Always create System Restore Point
>> Always select Custom (Advanced) type of installation
>> Always uncheck installation of 3rd party toolbars, etc
>> Don't forget to select "Restart later" option at the end

POINT 1: Always Create System Restore Point

Its always advised to create a System Restore point before installing a software. We are not saying that you should always create a System Restore point even if you are going to install a simple browser like Firefox, Chrome or a media player.
But creating a System Restore point before installing a transformation pack (aka customization pack or skin pack), a patcher or a tweaking utility is MUST.

Many times when we install a transformation pack in Windows, it modifies lots of system files and installs lots of eye candy software to change look-n-feel of Windows. If the transformation pack was not created carefully, it might mess up with your system and might crash your Windows. Here comes System Restore to the rescue. If you created System Restore point, you can restore your system back. If might also come handy when you don't like the new look of Windows and want to get the old look back.
Same case applies to patchers and tweaking utilities. Many times we install patching utilities like
 UX Theme Patchers. These patchers also modify Windows system files and if an incompatible patcher is used in Windows, it might also crash your Windows.

And what should I say about tweaking utilities? Everyone knows that almost all tweaking utilities modify Windows registry to enable or disable lots of hidden features. Sometimes enabling an unknown hidden feature using a tweaking utility might create problems. So its always a wise idea to create a System Restore point before installing a tweaking utility. Most of the times tweaking utilities allow you to create a System Restore point.

Now question is how to create a System Restore point? Not a big problem! You can access System Restore program using "Start -> All Programs -> Accessories -> System Tools" menu.
You can also launch it using System Properties. Right-click on My Computer icon on Desktop and select Properties. Or you can directly launch it by typing sysdm.cpl command in RUN or startmenu search box.

System_Restore

You can also directly launch it by typing create restore in startmenu search box in Windows Vista and 7.

POINT 2: Always Select Custom (Advanced) Type of Installation

Once you have created System Restore point, lets move further. Almost all setup provide 2 types of installation:

>> Standard (or Easy or Express)
>> Custom (or Advanced)

Always select "Custom (Advanced)" installation type because this type of installation provides full control over the installation. If you don't select custom installation type, you'll not be able to customize various parts of installation and it'll install the software with built-in configuration.

Select_Custom_Advanced_Installation

We talked about bundling toolbars, adware with software setups. You can disable installations of all such unwanted stuffs only when you select "Custom (Advanced)" installation type.

POINT 3: Always Uncheck Installation of 3rd Party Toolbars, etc

Now when you select the "Custom (Advanced)" installation type, make sure the software is not bundled with 3rd party toolbars or adware. Most of the times when a software setup comes with such unwanted stuff, it shows a screen similar to following one:

Uncheck_Toolbar_Homepage_Search_Engine_Installation

So always make sure to uncheck the checkboxes which ask you to install the toolbar, set their website as your browser homepage or install their search engine.

POINT 4: Don't Forget to Select "Restart Later" Option at the End

Once the setup completes the installation and shows the final screen where you need to click on "Finish" button, don't click on the button immediately. Just relax and double-check the checkboxes or radio buttons given in the final screen.

Many times the software asks you to restart the system and it usually selects "Restart Now" button by default and if you click on Finish button without noticing it, Windows will restart the system and you'll lose your important documents which were not saved or website links which were opened by you in your web browser.
So make sure you enable "Restart Later" option before clicking on Finish button. Many times the software doesn't show checkboxes or radio buttons, instead it shows a dialog box having 2 buttons "Restart Now" and "Restart Later". Make sure you click on the 2nd button "Restart Later".

Restart_Later_Option

part from restart option, a software might also show checkbox to install another 3rd party software in final screen and most of the times the checkbox is enabled by default. So if you click on Finish button in hurry, the setup will also install that unwanted software. So make sure you uncheck any of such option before clicking on Finish button.

That's all for now guys. I hope you enjoyed the article. If you want to share some other important points which one should keep in mind while installing software, please do share them in your comment...