Showing posts with label Windows 8. Show all posts

Enable “Betta Fish” Boot Screen In Windows 8 Developer Preview

Back in June 2011, three Windows 8 builds were leaked to the web. Those builds were packed with a cool Betta Fish boot screen. Many of you might have even seen the pictures and videos of the Betty Fish boot screen. To speed up the boot time, Microsoft removed this boot screen and replaced it with a simple one in Windows 8 Developer Preview build.


Users who are looking for a way to enable the beautiful Betty Fish boot screen in Windows 8Developer Preview will be delighted to know that the old Fish boot screen can be enabled in Windows 8 DP with a simple workaround.  This workaround by our friend 3ricky114 allows you enable the Betta Fish boot screen in Windows 8 Developer Preview build.

The workaround involves replacing a default system file. So, we’d suggest you create a manual system restore point before attempting this procedure on your PC. We tested this workaround on Windows 8 Developer Preview build (x86) and can confirm that it works without any issues.


Procedure:

Step 1: Create a manual system restore point so that you can revert to the original system settings in case anything goes wrong.

Step 2: Open Windows Explorer, navigate to C:\Windows\Boot folder. Here, “C” is your Windows 8 drive letter.

Step 3: Locate Resources folder and then take the ownership of it with the help of our how to take ownership of files and folders in Windows 8 guide.

Step 4: Open Resources folder, rename bootres.dll file to bootresbackup.dll. We are not deleting the original bootres.dll file so that we can return to the original boot screen with ease.


Step 5: Now download the custom bootres.dll file from here. This bootres.dll file has been taken from Windows 8 7989 build.

Step 6: Copy the new bootres.dll file to C:\Boot\Resources folder. Reboot your PC to see the new Betta Fish boot screen. Good luck!


To return to the original boot screen, you can use the previously created restore point or follow the steps given below. Navigate to C:\Boot\Resources folder. Rename bootres.dll (the custom bootres.dll) to bootrescustom.dll. Finally, rename the bootresbackup.dll to bootres.dll. You are done.

BOOTICE – Modify, Backup, And Restore Master Boot Record & Partition Boot Record


BOOTICE is a portable utility developed for power users who need to either modify or backup and restore MBR (Master Boot Record) and PBR (Partition Boot Record) of  local drives or removable media including external hard drives, USB drives, etc. For those who don’t have clue of these boot records, MBR is generally referred to as first sector (size : 512 bytes) of any partitioned drive whereas volume or partition boot record holds code to initiate booting and is invoked by MBR.

Warning for beginners: It is not advisable to fiddle around with master boot record or with volume boot record, as it can change system booting process and can leave your PC unbootable. We will recommend that you use BOOTICE with removable media and not with auxiliary storage disks.

Coming back to features, it lets you backup MBR of selected drives (primary or external) and enables you to create disk images (IMG & IMA format), fill up disk space with random data, manage partitions while allowing you to edit Boot Configuration Data (BCD file) to tweak with system booting process.
It supports multiple boot record types ranging from Windows NT 5/6, Plop Boot Manager, SYS Linux, to Grub4Dos. On the main interface, it displays all attached external storages along with primary disk. Underneath it, you have options to process MBR & PBR, to bring up partition manager and check out disk data sector-wise. Process MBR and Process PBR buttons let users backup and restore the boot record. Before starting out, you need to choose the boot record type to begin the process. The backup is created in BIN format. It’s must be noted here that before restoring boot record, you will need to specify the correct boot type with which boot record backup was created.


Partition Manager allows user to backup and restore partition table, change and remove drive ID, format/re-format disk with a facility to format only selected part of disk.


As mentioned beforehand, it is capable of processing disk images in IMG or IMA format, you can select the disk image file to backup its master boot record & volume boot record and view the data distribution in sectors. Depending on the OS type, it can bring up BCD file editor with relative options to change booting process. Under BCD Edit tab, BCD file can be specified manually or you can let it find out the location of currently active OS BCD file.


Random data filling makes data on selected disk unrecoverable. With its Disk filling feature you can fill selected disk with 0×00, 0xFF or with custom data in snap to ensure data safety.


We found BOOTICE to be very useful. Since it is a portable application, you can carry it anywhere to modify and backup MBR and PBR of almost all types of disks. With other complementary options like BCD editing and data filling, booting behavior can be altered on the fly without having to search for BCD file while you can destroy disc data by filling random junk to prevent recovery operations. It supports Windows 2000, Windows XP, Windows Vista, and Windows 7.

Download

How To Uninstall Windows 8


The recently released Developer Build of Windows 8 comes with far less number of features and UI enhancements that will be included in final release of Windows 8, therefore many users have decided to remove Windows 8 from their system after testing it out. The Developer Build has been specifically released for Windows application developers to build new applications for Windows 8 and test and fix compatibility issues. If you’re about to uninstall or remove Windows 8 from your system, there are few things which must be considered before you start off with the process. First, it’s advised to remove or disconnect Windows Live account and create backup of important files and folders to external storage device. Windows 8 dual booted with Windows 7 can be easily removed from the system by formatting the Windows 8 drive, but dual boot option (which asks you to choose the OS to boot) in Advance Boot Options menu has to be manually removed. In this post, we will let you know how to completely and safely remove Windows 8 dual booted with any other OS.

To begin, login to Windows 8 and move all important files and folders to external storage device, remote network location, or to local drives except one on which Windows 8 is currently running. Once data backup is complete, reboot your system, choose Windows 7 from boot options.

After logging into Windows 7, open My Computer, right-click Windows 8 drive, and select Format. Select File system followed by default Allocation unit size, enable Quick Format and click Start to begin the disk formatting process.


After formatting the drive, you need to remove the Windows 8 Developer Preview boot option from Advanced Boot Options menu. This requires using BCDEdit command to modify or remove the Windows 8 Developer Preview boot entry. However, if you want a GUI alternative for BCDEdit command, download BOOTICE.

BOOTICE is a portable, Windows utility which allows you to edit Boot Configuration Data file from a simplified interface. Launch BOOTICE.EXE and head over to BCD Edit tab. Make sure that The System BCD option is enabled. Click View / Edit button.


It will open BCD editor. Select Windows Developer Preview from left sidebar and hit Del to delete the Windows 8 Developer Preview entry from Advance Boot Options menu.


You can follow same steps for removing Windows 8 Server Developer Preview from the system. After you’ve formatted the Windows 8 Server drive, launch BOOTICE, open BCD editor and delete the Windows Server Developer Preview entry in system BCD file.


Users who did a clean install of Windows 8 Developer Build after removing Windows 7 need to use Windows 7 installation disc to remove Windows 8 Developer Build and then install Windows 7 on their PCs. As of now, Windows 8 doesn’t allow upgrading your PC from Window 7 to Windows 8. We will keep this post updated with Windows uninstallation methods for each iteration of Windows 8 version.

Smart Folders: Freeware to Get iOS and Android Style Folder Creation Functionality in Windows

If you have used Apple iOS or Google Android OS, you must be aware of a built-in feature which allows you to create a new folder using a simple drag-n-drop of one app over another.

On the other hand, Microsoft Windows OS doesn't come with such a useful feature. Although Windows provides keyboard shortcut "Ctrl+Shift+N" to create a new folder or you can click on "New Folder" button present in Explorer toolbar or you can right-click and select "New -> Folder" option.
Today we are going to share a free and portable tool which brings this useful drag-n-drop functionality to create new folder in Windows.

"Smart Folders" is a free utility for Windows released by our friend site addictivetips which allows you to create a new folder by simply dragging-n-dropping one or more selected files over another file. For example, you have 4 text files on Desktop and you want to move them in a new folder. You just need to select 3 text files and drag-n-drop them over the 4th one and this free software will automatically create a new folder on Desktop and will ask you to provide a name for it.


When you run this app first time, it asks you to register the file types. You just need to click on "Install" button and you have done. By default, this utility registers all known and built-in file extension but some 3rd party software use their own file extensions like .psd of Adobe Photoshop. If you like this freeware to work for these 3rd party extensions as well, you can manually register these file extensions by typing the file extension in given text box and click on "Register" button. You can unregister any particular file extension later if you want.
This free utility can be used in Windows XP, Vista and Windows 7. Both 32-bit and 64-bit editions are supported.

You can download it using following link:

Download Smart Folders

List of Easter Eggs by Google

Today we are going to share 4 new easter eggs found in Google Search.


  • Do a Barrel Roll
  • Tilt
  • Let it Snow
  • Hanukkah


"Do a Barrel Roll" or "Z or R Twice" easter egg is inspired from a video game "Star Fox" developed by Nintendo in which a rabbit asks to do a barrel roll.

To enjoy this easter egg, simply type "Do a Barrel Roll" or type "Z or R Twice" in Google search box and the search results page will do a barrel roll before showing the results.


"Askew" or "Tilt" is another cool easter egg in which the search results page looks a bit weird and out of place. To enjoy this easter egg, simply search for either "askew" or "tilt" in Google.


"Let it Snow" is a new easter egg found by AskVG readers "kennethesp" and "SaidSikiraX" in Google search results page. A Christmas gift from Google team:


"Hanukkah" is also known as Festival of Lights. This easter egg shows a nice row of stars below the Google search box:


These easter eggs work in almost all modern web browsers. If you know about any other easter egg, feel free to share it in your comment...

Microsoft Releases 2 New Ice Themes “Ice Water” and “Party Ice” for Windows 7

Microsoft has released 2 new ice themes "Ice Water" and "Party Ice" for Windows 7 and Windows 8 users.
Ice Water:
Ice and water go together like Astaire and Rogers, cookies and milk, and all the other great teams: beautifully. Each on its own is nice, but together they create something with extra sparkle. Add glamorous images of this all-time great team for free to your Windows 7 desktop.
Party Ice theme:
Set a party mood on your desktop with close-ups of colors filtering and reflecting through the prism of irregular ice cubes. Add a black light for maximum grooviness. Download this free Windows 7 theme to get the party started.
Download the .themepack file, double-click on it and Windows will automatically install and apply it.

SageThumbs: Free Windows Explorer Extension to Show Thumbnail Previews and Convert Image Formats

As we all know we can show thumbnail previews for image files in Windows Explorer to view or identify the image without opening it. But by default Windows can't show thumbnail previews for all image file formats. There are a few file formats like PSD, TIFF, TGA and XCF which can't be previewed by Windows Explorer.

Wouldn't it be great if we could see thumbnail previews for almost all image files in Windows Explorer? Don't worry! Today we are going to share an absolutely free and small extension for Windows Explorer which allows you to show thumbnail previews for many unsupported file formats in Windows Explorer.
"SageThumbs" is an excellent shell extension for Windows which allows you to preview almost all image file formats in Windows Explorer. It uses popular image viewer XnView's GFL library for this task.

1

Along with showing thumbnail previews, it also allows you to convert an image format to another which is an extra benefit of using this small utility. You can convert an image format into JPG, GIF, PNG and BMP file formats.

You can even see an image file thumbnail preview in its context menu, Just right-click on an image file and you'll see its thumbnail preview in context menu.

You can also set the image file as Desktop wallpaper by right-click on it and select the desired option. You can also select the wallpaper type (stretched, tiled, centered).

2

This extension adds some detailed information in image files tool-tips. Whenever you hover the mouse cursor over an image file, you can see extra info like resolution DPI, compression format, colors, etc in its tool-tip.
If you want, you can enable / disable a particular image file format to be previewed by SageThumbs using its Options window. You can also disable its context menu entry, thumbnails in Explorer or customize thumbnail size, conversion options, etc using its Settings.

3

Features List:


>> Extended thumbnail image view of Explorer folder
>> Thumbnail image in explorer context menu
>> Extended info tips
>> Support 162 image formats (224 extensions)
>> Support additional 26 image formats via XnView plugins
>> One-click conversion to popular image formats support
>> Wallpaper selection support
>> Copy to clipboard support

This extension can be installed in Windows 2000, XP, Vista, Windows 7, Windows Server 2003 and 2008. Both 32-bit and 64-bit editions are supported.

You can download it using following link:

Download SageThumbs


[Guide] Safety Precautions to Setup and Install a 3rd Party Software in Windows

We all know that installing a software in Windows is not a very hard task, its quite easy. You just need to follow a few simple steps given in the setup wizard to complete the software installation. Most of the times you just have to click on the "Next" button 2-3 times to finish the setup process.

I have seen many people saying, "Just click on Next, Next, Next and done." while teaching someone how to install a software. And guess what? If you are going to follow such kind of advices, get ready to install some adware, spyware or unnecessary and undesired software as extra bonus. Actually many times when we get a 3rd party software from Internet, CD or from a friend's PC, chances are the software is bundled with unwanted toolbars or adware. Software developers get paid from the companies to include their toolbars or other undesired stuffs in setups.

There are many other drawbacks of not taking precautions while installing software. Today in this article, we are going to share a few very important points which you should always keep in your mind while installing a software.

The important points are:

>> Always create System Restore Point
>> Always select Custom (Advanced) type of installation
>> Always uncheck installation of 3rd party toolbars, etc
>> Don't forget to select "Restart later" option at the end

POINT 1: Always Create System Restore Point

Its always advised to create a System Restore point before installing a software. We are not saying that you should always create a System Restore point even if you are going to install a simple browser like Firefox, Chrome or a media player.
But creating a System Restore point before installing a transformation pack (aka customization pack or skin pack), a patcher or a tweaking utility is MUST.

Many times when we install a transformation pack in Windows, it modifies lots of system files and installs lots of eye candy software to change look-n-feel of Windows. If the transformation pack was not created carefully, it might mess up with your system and might crash your Windows. Here comes System Restore to the rescue. If you created System Restore point, you can restore your system back. If might also come handy when you don't like the new look of Windows and want to get the old look back.
Same case applies to patchers and tweaking utilities. Many times we install patching utilities like
 UX Theme Patchers. These patchers also modify Windows system files and if an incompatible patcher is used in Windows, it might also crash your Windows.

And what should I say about tweaking utilities? Everyone knows that almost all tweaking utilities modify Windows registry to enable or disable lots of hidden features. Sometimes enabling an unknown hidden feature using a tweaking utility might create problems. So its always a wise idea to create a System Restore point before installing a tweaking utility. Most of the times tweaking utilities allow you to create a System Restore point.

Now question is how to create a System Restore point? Not a big problem! You can access System Restore program using "Start -> All Programs -> Accessories -> System Tools" menu.
You can also launch it using System Properties. Right-click on My Computer icon on Desktop and select Properties. Or you can directly launch it by typing sysdm.cpl command in RUN or startmenu search box.

System_Restore

You can also directly launch it by typing create restore in startmenu search box in Windows Vista and 7.

POINT 2: Always Select Custom (Advanced) Type of Installation

Once you have created System Restore point, lets move further. Almost all setup provide 2 types of installation:

>> Standard (or Easy or Express)
>> Custom (or Advanced)

Always select "Custom (Advanced)" installation type because this type of installation provides full control over the installation. If you don't select custom installation type, you'll not be able to customize various parts of installation and it'll install the software with built-in configuration.

Select_Custom_Advanced_Installation

We talked about bundling toolbars, adware with software setups. You can disable installations of all such unwanted stuffs only when you select "Custom (Advanced)" installation type.

POINT 3: Always Uncheck Installation of 3rd Party Toolbars, etc

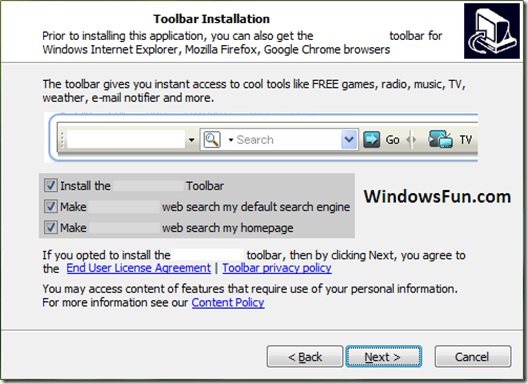
Now when you select the "Custom (Advanced)" installation type, make sure the software is not bundled with 3rd party toolbars or adware. Most of the times when a software setup comes with such unwanted stuff, it shows a screen similar to following one:
Uncheck_Toolbar_Homepage_Search_Engine_Installation

So always make sure to uncheck the checkboxes which ask you to install the toolbar, set their website as your browser homepage or install their search engine.

POINT 4: Don't Forget to Select "Restart Later" Option at the End

Once the setup completes the installation and shows the final screen where you need to click on "Finish" button, don't click on the button immediately. Just relax and double-check the checkboxes or radio buttons given in the final screen.

Many times the software asks you to restart the system and it usually selects "Restart Now" button by default and if you click on Finish button without noticing it, Windows will restart the system and you'll lose your important documents which were not saved or website links which were opened by you in your web browser.
So make sure you enable "Restart Later" option before clicking on Finish button. Many times the software doesn't show checkboxes or radio buttons, instead it shows a dialog box having 2 buttons "Restart Now" and "Restart Later". Make sure you click on the 2nd button "Restart Later".

Restart_Later_Option

part from restart option, a software might also show checkbox to install another 3rd party software in final screen and most of the times the checkbox is enabled by default. So if you click on Finish button in hurry, the setup will also install that unwanted software. So make sure you uncheck any of such option before clicking on Finish button.

That's all for now guys. I hope you enjoyed the article. If you want to share some other important points which one should keep in mind while installing software, please do share them in your comment...

Internet Explorer 10 PP4 Released, Download Link Inside

Microsoft has released 4th Platform Preview of its upcoming web browser IE10.
According to Microsoft, this new IE10 Platform Preview 4 only supports Windows 8 developer preview which means you can't install it in previous Windows versions like Windows XP, Vista or 7.
This IE10 preview adds more support for HTML5 technologies, enabling richer Web applications with significantly improved performance. IE10's hardware acceleration of technologies like SVG, CSS3 transforms and animations delivers faster rendering than other browsers.
Highlighted Features:
  • Cross-Origin Resource Sharing (CORS) for safe use of XMLHttpRequest across domains.
  • File API Writer support for blobBuilder allowing manipulation of large binary objects in script in the browser.
  • Support for JavaScript typed arrays for efficient storage and manipulation of typed data.
  • CSS user-select property to control how end-users select elements in a Web page or application.
  • Support for HTML5 video text captioning, including time-code, placement, and captioning file formats.
IE10 Preview 4 introduces an updated quirks mode that is more consistent and interoperable with the way quirks modes works in other browsers like Firefox, Chrome, Safari, and Opera. This updated quirks mode supports quirks for page layout, while allowing use of more up-to-date standards features like HTML5 elements for audio, video, canvas, and more.

You can download it using following link:

Direct Download Link

Comparison Between Windows 7 and Windows 8 Memory Management System

We all know that Windows 8 is under development and a Developer Preview build is available to download for public.
Microsoft has also talked a lot about Windows 8 new features and enhancements at Windows 8 blog.
Today Microsoft has shared some interesting details about Windows 8 memory management system at official Building Windows 8 blog.
According to Microsoft, their goal with Windows 8 from the beginning was to ship with the same system requirements as Windows 7. An important task for Windows 8 was to make room for new functionality while looking for opportunities to reduce the memory consumed by existing functionality and consumed across the board.


Windows 7 vs. Windows 8 Memory Consumption:


The easiest way to make a ballpark comparison of Windows 8 vs. Windows 7 memory use is to install both operating systems on a 1GB RAM machine (minimum OS RAM requirement) and compare them when they’ve been rebooted multiple times, and then idled for a while.
The below graphics compare memory consumption on an old netbook running Windows 7 at idle, and then with the same machine running Windows 8.


As you can see though, Windows 8 is doing well relative to Windows 7.
NOTE: For Windows 8, a clean install also contains the extended Windows Defender technology, which, for the first time incorporates complete antimalware functionality – also optimized for memory and resource use. (This functionality does not exist on a clean install of Windows 7 where we would recommend that you add security software).


Memory Combining:


When assessing the contents of RAM in a typical running PC, many parts of memory have the same content. The redundant copies of data across system RAM present an opportunity to reduce the memory footprint even for services and OS components.
Memory combining is a technique in which Windows efficiently assesses the content of system RAM during normal activity and locates duplicate content across all system memory. Windows will then free up duplicates and keep a single copy. If the application tries to write to the memory in future, Windows will give it a private copy. All of this happens under the covers in the memory manager, with no impact on applications. This approach can liberate 10s to 100s of MBs of memory (depending on how many applications are running concurrently).


Service changes and reductions:


OS services configured to run all the time are a significant source of ambient memory use. When assessing the set of OS services during Windows 8 planning, Microsoft decided to remove a number of them (13), move a different set of services to "manual" start, and also made some of the "always running" services move to a "start on demand" model. This is where a "trigger" in the OS (like device arrival or the availability of a network address) causes the following to occur:
  • The service starts.
  • The service does its thing (whatever that happens to be).
  • It hangs around for a while to make sure there isn’t anything else to do, and
  • The service goes away.
You'll notice that Plug and Play, Windows Update, and the the user mode driver framework service are all trigger-started in Windows 8, in contrast to Windows 7, where these services were always running.


More granular prioritization of memory:


Windows 8 has a better scheme for the prioritization of memory allocations made by applications and system components. This means that Windows can make better decisions about what memory to keep around and what memory to remove sooner.
For example, antivirus programs (AV) do various checks on files when they are being opened by other programs. The memory that the AV program allocates to check virus signatures is usually a one-time allocation (it is unlikely that specific memory will be needed again). On Windows 7, the memory is treated as if it had the same priority in the system as other memory (say, memory allocated by a running instance of Microsoft Excel). If memory became scarce, Windows 7 could end up removing the memory that helps another running application (like Excel) stay responsive for the user, which wouldn’t be the best choice for system responsiveness in this case.
In Windows 8, any program has the ability to allocate memory as “low priority.” This is an important signal to Windows that if there is memory pressure, Windows can remove this low priority memory to make space, and it doesn’t affect other memory required to sustain the responsiveness of the system.
Now that's an impressive thing to know about Windows 8. It seems we'll not need to change services type to manual to speed up Windows 8 like previous Windows versions or will we need?

How to Activate Hidden Side Panel Charm Using Keyboard Shortcut in Windows 8 Developer Preview?

We all know that when Microsoft started showing official previews of Windows 8 testing builds, the Start, Share, Devices, etc charms used to show in right-side panel and the charm showing date and time used to show in bottom-left corner of screen.
When Windows 8 Developer Preview released to public, Microsoft changed the location of both the things. Start charm moved to bottom-left and date/time charm moved to bottom-right corner.


The old side panel charms can be still accessed only on touch screens by swiping from right edge to left edge. But on normal Desktops or laptops you only get the new charms.
Did you know you can still access the old charms on machines without touch screen using a simple keyboard shortcut?
To access these hidden old charms, you just need to press WIN+SHIFT+C keys together at the Start screen and you'll see the old charms as shown in following screenshot:


Pulmon: Free Utility to Get Windows 8 Style Live Tiles with Metro UI on Windows Desktop

We all know about Start Screen introduced in Windows 8 which shows live tiles of installed programs in Windows 8.

Today we are going to share another freeware "Pulmon" which brings live tiles similar to Windows 8 Start Screen to Windows XP, Vista and 7 Desktop. This free and portable tool has been created by "Paras Sidhu", a 13 year old developer from India.
To use, it you just need to download it, extract the RAR file using WinRAR or 7-Zip and then run Pulmon.exe file. It'll show the main window on screen.
You just need to click on a tile to add it to Desktop. Once you have added the tiles, click on "Move To Tray" button to hide main window. You can access it anytime by double-clicking on its system tray icon.
To remove a tile, again open the program window and click on the tile present in "Remove Tiles" section.

It's very simple to use. Currently it comes with following tiles:
User: Clicking "User" tile will open a User Widget. If you want to open User Accounts, double-click on the green place of tile or double-click on User Avatar. There are many tweaks available for user tile. Right click on the tile and click options. You can choose "Take User Avatar from Windows System" or choose custom avatar.
Control Panel: Clicking Control Panel tile will load Control Panel widget. You can open Control Panel by clicking on its tile.
Clock: Pulmon will provide you a very cool widget "Clock". It will show you time, month and day of the week.
Shutdown Manager: It's a very easy to use widget which allows you to control your PC with one click. Shutdown, Restart, Log Off and Hibernate options are given. Please note that some of the features are not working atm.
Internet Explorer: This tile allows you to open Internet Explorer web browser.
Webby: Webby is another good widget which provides you quick access to tech sites like AskVG.com, etc.
Custom Widget: It allows you to pin apps. But only 1 trial widget has been added. You can configure its settings by right click on it and choose "Settings". The default program is Windows Notepad.
Clipboard Manager: It allows you to see the current text on clipboard. It also allows you to clear clipboard content.
Start Menu Launcher: It's a simple launcher for Start Menu. Just double click on the tile to open start menu.
Please note that Pulmon is currently in Beta stage. More tiles will be added in upcoming versions.
You can download it using following link: